Publishing ArcGIS Online Tile Packages
I have been working with a small city to get an ArcGIS Online solution up and running. I had watched one of the hour long Esri web seminars that showed it was possible to create and publish a tiled service without burning any credits. One of the great things is you don't need ArcGIS for Server, just ArcGIS for Desktop and an ArcGIS Online for Organizations subscription. Being able to publish one of the Local Government Basemaps as a cached service without using any credits is ideal for a small city.
Author the Map, or Use a Local Government Template
The first step is to author your map, following all of the guidelines for efficient web maps such as grouped layers that turn on and off at the standard Esri/Google/Bing scale levels. I published the general basemap template from the Local Government community on the Esri solutions site.
If you use one of the templates, you need to change a few things. First of all, you need to point the map to your copy of the Local Government Information Model. I do this by changing the name of the file geodatabase the template is pointing to, then open my copy of the template and click on one of the red exclamation marks and point the map to the corresponding layer in my LGIM geodatabase. ArcMap then fills in all of the other layers that are in your LGIM geodatabase.
You are probably going to need to zoom to your
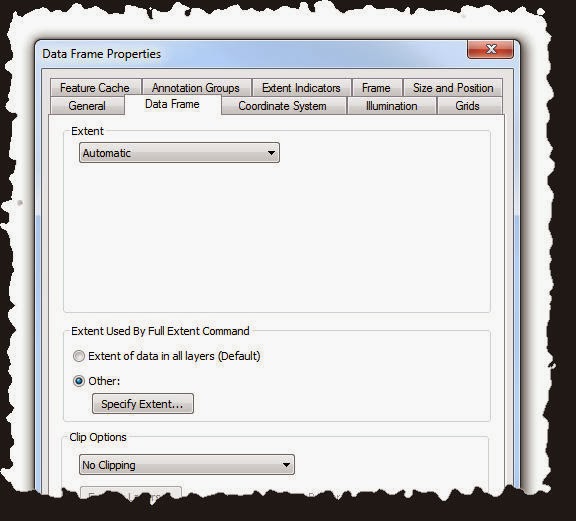
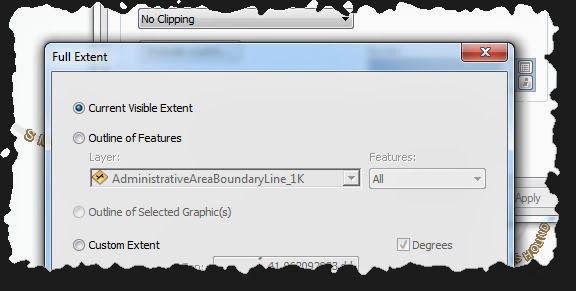
data's extent - right click on one of your layers and choose Zoom To Layer. Then zoom the map to the extent you want to be the default extent of your online service. Next you need to change what ArcMap uses as the full extent for your data frame, in the templates Esri has this set to a specified extent around the sample data. Open the Data Frame Properties window by double clicking the data frame name ("Layers" in the templates). Go to the Data Frame tab and in the Extent Used By Full Extent Command area, choose the "Other" radio button, then click on the "Specify Extent" button. In the Full Extent dialog select the Current Visible Extent radio button and click OK. While you are in the Data Frame Properties dialog make sure the No Clipping option is selected in the Clip Options area. I have read on forums that maps
don't publish well if they are clipped to the shape of a layer or a custom extent. Click OK on the Data Frame Properties dialog. You can make sure the full extent works by zooming the map to another scale or area then click the full extent button (globe button) on the standard toolbar. This will ensure that the "Zoom To" option in an ArcGIS Online map functions properly, it will also allow your service to show up in spatial searches in ArcGIS Online.
You will also want to change some of the items in the Map Document Properties dialog. Go to File - Map Document Properties and add and change any necessary information. I usually leave the Author as Esri, Inc because they did author the map. I change the credits to by my firm, the city I am working for and Esri Inc. I leave the title, summary and description as they are with the original template.
Change the data source.
Change the full extent of the data frame.
 |
| Set the full extent for the data frame. |
 |
| Choose - "Current Visible Extent". |
You will also want to change some of the items in the Map Document Properties dialog. Go to File - Map Document Properties and add and change any necessary information. I usually leave the Author as Esri, Inc because they did author the map. I change the credits to by my firm, the city I am working for and Esri Inc. I leave the title, summary and description as they are with the original template.
Share as a tile package.
The next step is to share your map as a layer package. This takes your map and creates tile images of the map at the standard ArcGIS Online/Google/Bing scale levels. This is why you set up your map to draw and label layers certain ways when it is drawn at specific scales. To accomplish this you need to first make sure you are signed on to your ArcGIS Online account in ArcMap, this will require an ArcGIS Online for Organizations subscription. Go to File - Sign In and enter your ArcGIS Online username and password. It is also advisable to check the Remember Me, Remember My Password and Sign Me In Automatically check boxes. I have read in the forums that large tile packages may time out if these boxes are not checked. You can click on the Forget Me link later after the tile package is uploaded to ArcGIS Online. To create the tile package and upload it to ArcGIS Online, go to File - Share As - Tile Package... If Tile Package is not among your choices you need to first enable ArcGIS run-time tools in the ArcMap Options dialog. To do this go to Customize - ArcMap Options... then go to the Sharing tab. In the Packaging section, check the "Enable ArcGIS Runtime Tools" check box.
Tile Package Wizard
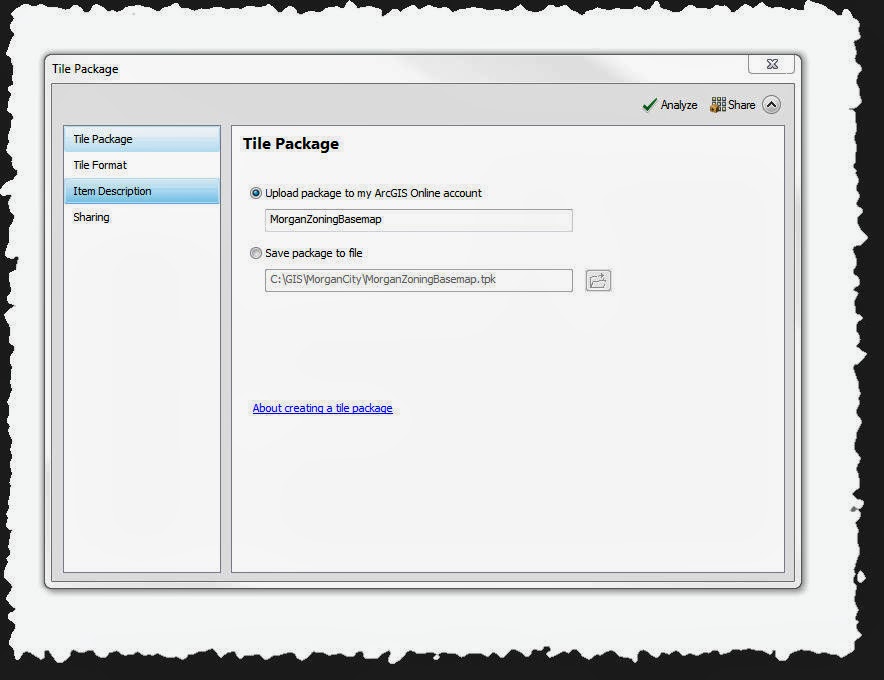
Now Tile Package should be a choice in the "Share As" File Menu list. After choosing to share the map as a tile package, you should see the Tile Package wizard. In the Tile Package selection on the left choose
 |
| Tile Package Wizard |
"Upload package to my ArcGIS Online account". And give the package a name. I have tried both of the options on this page, and the first option is easiest. You can choose the "Save package to file" and then use the "Share Package" tool in the Data Management toolbox in the Package tool set, but the first option does both for you. I may have read that large packages may need to use the second option, but I would try to upload it directly first.
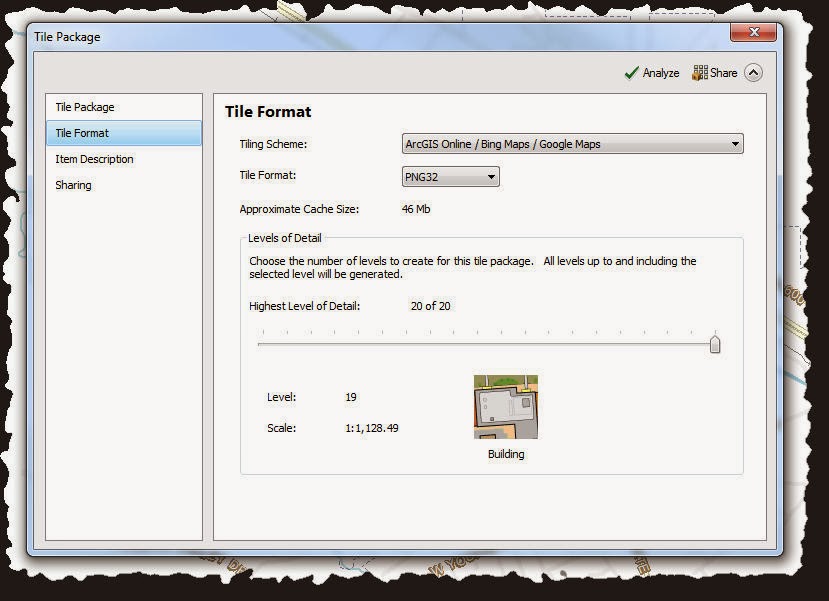
In the Tile Format section of the wizard, leave everything as the default *except* the Tile Format choice. I tried and tried to use the default PNG choice but every time had something go wrong. I finally had partial success using the MIXED choice,
 |
| Tile Format Page |
but I think this choice is for raster data. My basemaps had both raster and vector data. I found PNG32 to work the best for the basemaps. Since that choice worked for me, I didn't try any of the other choices besides the default and MIXED. If you don't want your map to be drawn at the highest scale level, adjust the slider to the desired level. A little picture shows you what an example of the highest level you have selected would be. I leave it to create tiles at all scale levels because I am dealing with a small geographic area for a city.
The Item Description options should already be filled out for you. The wizard takes these items from the ArcMap Document Properties information you filled out earlier. You can choose to share your tile package in your organization on the Sharing page of the wizard, but I leave this page alone because I am going to publish the package later in ArcGIS Online. If you want to, click Analyze at the top to analyze your map for online display. This is actually done for you if you click Share, so I just click the Share button. If there are any errors, you need to fix those, the wizard won't continue until they are fixed. If there are warnings about performance or display speed, you can forget about those, it may take longer for your tiles to be generated, but it won't affect performance in the online map because it is accessing your tiles not a map service.
ArcMap will start generating tiles and give you a progress window telling you which scale level it is currently working on. Once tiles are generated, the progress dialog changes to tell you it is uploading the package to ArcGIS Online with an estimate of how much time is left. ArcMap will tell you that it has successfully created the tile package and uploaded it to ArcGIS Online.
Publish the tile package on ArcGIS Online.
Now use your browser to go to ArcGIS Online. Log in to your organization account. You will need Publisher permissions to publish your tile package. Go to the My Content page and select your tile package title in the list. This will open a page with the details of the tile package with some options along the top. One of the options is Publish. Click Publish and you will be asked for a name for you map service. After entering a name, enter at least one tag, but add anything that you think describes the data and will help people find it. After you click Publish, you will see a few progress statements then you will be taken to your new service's description page. The thumbnail of the service should start showing that it is publishing tiles, and you can see a percentage of the tiles published on the Tiles line of the Publishing section. Once 100% of the tiles are published, you can add the service to an ArcGIS Online map, you can add it to an ArcGIS Desktop map, or you can use the link under Map Contents to configure Local Government apps.
Other Considerations
After publishing your tile package, you can share the service with groups in your organization, or share it with everyone. When you share it with everyone, your service will turn up in spatial searches and keyword searches for ArcGIS Online users.
You will be charged credits for the amount of disk space your tile package and service use. The rate is 1.2 credits per gigabyte of storage per month. Here is a link showing what will cost you credits on ArcGIS Online. You may be able to delete tile package that you uploaded after you have published it to reduce your storage credit usage, and this may be where you want to save the tile package locally and upload it with the Share Package tool. I may try that workflow and comment about the results.
